WSO2 App Manager - Web Application Creation end user configuration guide
In this post I'm trying to discuss the configuration options available in creating a WebApp.
To create a Web Application you need to log into publisher with an user who has the "Internal/creator" (or "admin") Role.
URL: http://<IP_ADDRESS>:9763/publisher
Login to Publisher > Click on Web Applications > Add New Web Application

Overview section

| Overview Properties: | |
| Author | Username of the user who publish the app |
| Name | Application name (for internal usage only) |
| Display Name | Application Display Name |
| Context | URL Context |
| Version | Version of the Application (eg: 1.0, 1.1, 2.0) |
| Make As Default Version | When creating a new Application this is always set as marked and later when you create another version of the same Application you can swap the default versions (Please refer wso2-app-manager-multiple-versioning for more information) |
| Transports | Transport protocol (either HTTP or HTTPS) |
| Treat as a Site | If you select this, the published App will be act as a Site. (WSO2 AppM supports 3 type of Application types. WebApps, Mobile Apps and Sites) |
| Web App URL | Back end actual URL of the Application (eg: http://wso2.com) |
| Description | Description about the Application |
| Thumbnail | You can browse the image of the Thumbnail to be displayed |
| Banner | You can browse the image of the Banner to be displayed |
| Tags | You can define multiple tags against each application which will be useful when searching Apps by keywords (eg: HR, Educational, Engineering, etc) |
Policies Section
Under Policies we have 2 main categories:
- Global Policies : Global Policies are applied agains an Application
- Resource Policies: Resource Policies are applied agains the selected resource patterns of an Application

Global Policies

| Global Policy properties: | |
| Allow Anonymous Access | Make the whole App anonymously accessible. In the Store, users will be able to access the app (all the resources patterns inside the app) without login in. Eg: We we mark http://wso2.com as anonymous, users will be able to access any page inside (eg: http://wso2.com/contact/ , http://wso2.com/partners/) anonymously (Please refer wso2-app-manager-anonymous-app-support for more information) |
| Skip Creating Proxying WebApp | This will skip the gateway. It will allow users to directly access the back end actual URL without going through the gateway(proxy). So in the Store - overview page it will show the actual back end URL |
| Restrict Visibility | Configuration of Role Based Visibility in WSO2 AppM. You can specify the Roles which are eligible to access the App. So in the Store only Users with the particular Roles (and of course the users with Admin Role) will only be able access/view the App (Please refer wso2-app-manager-role-based for more information) |
| Enable Single Logout | You can define a custom Single Sign Out URL |
| Publish Statistics | Enable publishing statistics to BAM |
| Subscription Availability | Controls the subscription availability. WSO2 AppM allow users to subscribe to Apps in multiple tenants. Here you can control the subscription levels. There are 3 options available:
|
Resource Policies

Resource policies are applied agains selected resource patterns in an application.
When you need to apply several restrictions to some particular resource in a app you this will be useful.
Eg:
You have http://wso2.com as your back end but you need to add a throttling policy to a certain page (lets say http://wso2.com/register/) to limit access, Resource policies will be needful.
WSO2 AppM supported Resource based Policy types:
- Throttling : Controls/restrict the concurrent requests
- Anonymous Access: Allow users to anonymously access the resource pattern(s)
- Role based Restrictions: Grant access to users with selected Role(s)
- XACML policies (Entitlement policies): You can define XACML based authorization policies and apply against resource pattern(s)
- Define a Policy Group with required policy combination
- Apply the Policy Group against each Resource Pattern
When you are creating a new Application a default Policy Group with below default policy combinations are created by default. You can either change the properties or create new policy groups according to your requirement.
Default Policy Group settings:
- Throttling : Unlimited
- Anonymous Access: False
- Role based Restrictions: None
- XACML policies (Entitlement policies): None
To create a Policy Group:
Expand Policies > Resource Policies and click on "Add new Resource Policy" button.

| Resources based Policy properties: | |
| Resource Policy Name | Name of the policy Group |
| Description | Description about the policy group |
| Apply Throttling Tier | Select a Throttling Tier from available Tiers (Unlimited/ Gold/ Silver/ Bronze) Default concurrent access limits are:
For the Anonymous users throttling tier will not be applied and it always be unlimited. (Technical tip: You can customerize the tier setting as per your requirement by altering the tiers.xml file in /_system/governance/appmgt/applicationdata/ registry location) |
| Allow Anonymous Access | True/False Select 'true' to make the Resource pattern anonymously accessible (Please refer wso2-app-manager-anonymous-app-support for more information) |
| Accessible User Roles | Role based restriction for Resource patterns. You can specify the Roles which are eligible to access the particular Resource Pattern. So in the Store only Users with the particular Roles (and of course the users with Admin Role) will only be able access/view the particular Resource Pattern (Please refer wso2-app-manager-role-based for more information) |
| Entitlement Policy | You can define a XACML Policy in the admin-dashboard and apply the policy here. |
How to edit/delete policies in Policy Group?

Edit: Click on  icon to edit existing Policy Group details. But the policy changes will be effective once the cache is reset.
icon to edit existing Policy Group details. But the policy changes will be effective once the cache is reset.
Detele: Click on  icon to delete a Policy Group. It will only allow to delete the un assigned policy group(s) for any resource pattern.
icon to delete a Policy Group. It will only allow to delete the un assigned policy group(s) for any resource pattern.
How to assign a policy group to a particular resource pattern?
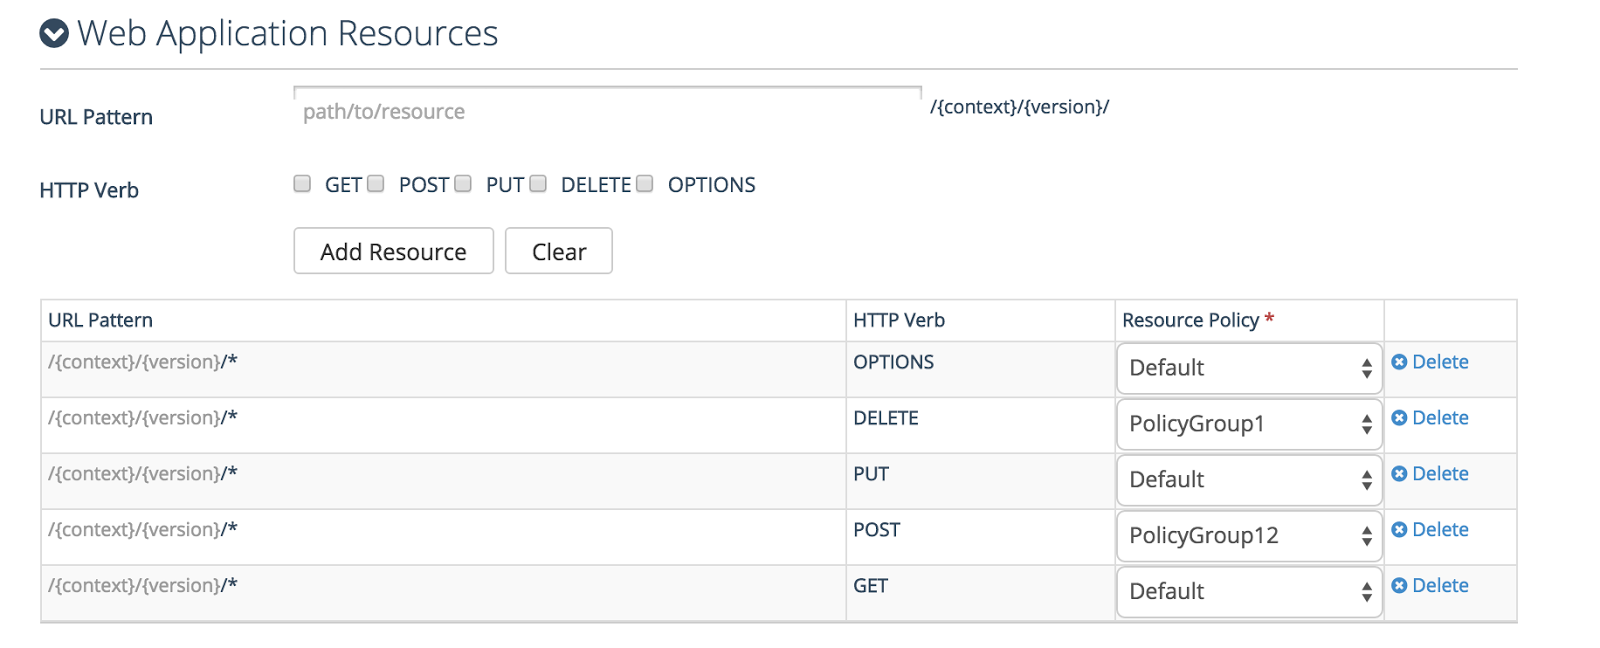
Under "Web Application Resources" section all the resource patterns will be listed in a grid view.
And under "Resource policy" column you can choose the relevant policy group agains each resource pattern.
Web Application Resources Section
Navigate to "Web Application Resources" section.

Here you can add multiple resource patterns and assign custom policies.
| Web Application Resources properties: | |
| URL Pattern | URL Pattern (Resource Pattern) is a sub domain or a page in side the actual endpoint of the Application. Eg: Actual End point of the App: http://wso2.com URL Pattern1: register (refers http://wso2.com/register) URL Pattern2: contact (refers http://wso2.com/contact) |
| HTTP Verb | Either GET/POST/PUT/DELETE/OPTION |
| Resource Policy |
Select the appropriate resource policy. By default, "Default" policy group is assigned to all patterns initially.
Eg: URL Pattern: /{context}/{version} /* HTTP Verb: GET Resource Policy: Anonymous-Group In this case the Anonymous-Group policies will be applicable for all the GET operations (all underneath URL Patterns as well). So another URL pattern like below will be override the permissions for mentioned resources. URL Pattern: /{context}/{version} /register HTTP Verb: GET Resource Policy: Default |
How to add a new resource pattern?
Type the URL Pattern, select the HTTP Verb and click on "Add Resource" button.
By default, the "Default" policy group will be assigned as Resource Policy and you can select the relevant Resource Policy from defined list.
By default, the "Default" policy group will be assigned as Resource Policy and you can select the relevant Resource Policy from defined list.
Advanced Configuration Section

Claims
In this section you can add claims against the newly created application.
What is a Claim?
Here you can find details about what is a Claim, how to add new mappings and many more details.
A claim be use as a container to pass specific attributed to back end service via a JWT (https://docs.wso2.com/display/AM190/Passing+Enduser+Attributes+to+the+Backend+Using+JWT)
How to add Claims?

Select the required claim from the "Available Claims" drop down and click on "Add Claim" button.
OAuth2 Key Manager Configuration

OAuth2 Key manager configurations can be stored here.
What is it?
WSO2 AppM supports SAML SSO to authenticate an user. If your backend application uses internal OAuth API calls you can use this feature to use the same SAML token generated by WSO2 AppM gateway, and get an OAuth2 access token by calling the token endpoints used by these APIs.
(Please refer https://docs.wso2.com/display/APPM110/Obtaining+an+OAuth2+Token+by+Providing+a+SAML+Token for further information)
| OAuth2 Key Manager Configuration properties: | |
| API Name | Alias for the API |
| API Consumer Key | Consumer Key of the OAuth API |
| API Consumer Secret |
Consumer Secret of the OAuth API
|
| API Token Endpoint |
URL of the token endpoint used by API
|
How to View the created WebApps and Sites
Once the WebApp/Site is Created successfully, it will be listed under Publisher listing page.
(Login to Publisher > Web Applications > All Web Applications)

WebApp/Site Listing:


Here you need to know that, you wont be able to change the app name,context and version.
If you need, you can change the display name. And if you need to change a version you can follow wso2-app-manager-multiple-versioning for more information.
(Login to Publisher > Web Applications > All Web Applications)

WebApp/Site Listing:

Edit an Application
To Edit the Apps you can simply navigate to app listing page and click on any app, do the changes and update.
Here you need to know that, you wont be able to change the app name,context and version.
If you need, you can change the display name. And if you need to change a version you can follow wso2-app-manager-multiple-versioning for more information.
No comments:
Post a Comment